
If you’re planning hardwood floor sanding in Ottawa, you’re about to take on one of the most rewarding home improvement projects there is. Few things transform a room like freshly sanded hardwood. But while it looks simple, sanding takes time, patience, and the right tools to avoid mistakes that can damage your floors.
Hardwood floor sanding in Ottawa helps restore floors worn down by years of salt, boots, and winter moisture, common culprits in our climate.
Here’s a complete, practical guide to help you understand what’s involved, how to prepare, and when it’s best to call in the pros.
Why Floor Sanding Matters
Sanding is the foundation of any hardwood floor refinishing in Ottawa. It removes scratches, old finishes, and uneven spots so the new stain and sealant can bond properly. When done right, it can extend the life of your hardwood floors by decades.
In Ottawa’s fluctuating weather, hardwood naturally expands and contracts. Over time, that movement can leave your floors with tiny ridges or gaps. Proper sanding smooths everything out again and makes refinishing possible.
How to Prepare for Hardwood Floor Sanding
Getting ready is half the job. The sanding process is cleaner and faster when your space is empty and organized.
- Clear the Room: Move all furniture, rugs, and décor out. If you can, complete sanding while the house is vacant.
- Seal Doors and Vents: Use plastic sheeting and painter’s tape to prevent fine dust from spreading through the HVAC system.
- Inspect the Floor:
- Hammer down loose nails with a nail punch.
- Fill large gaps with wood filler that matches your floor species.
- Patch any holes with corks or filler for a seamless finish.
- Hammer down loose nails with a nail punch.
Clean Thoroughly: Sweep and vacuum to remove dirt or grease. Sanding over debris can push contaminants deeper into the wood and affect the finish.
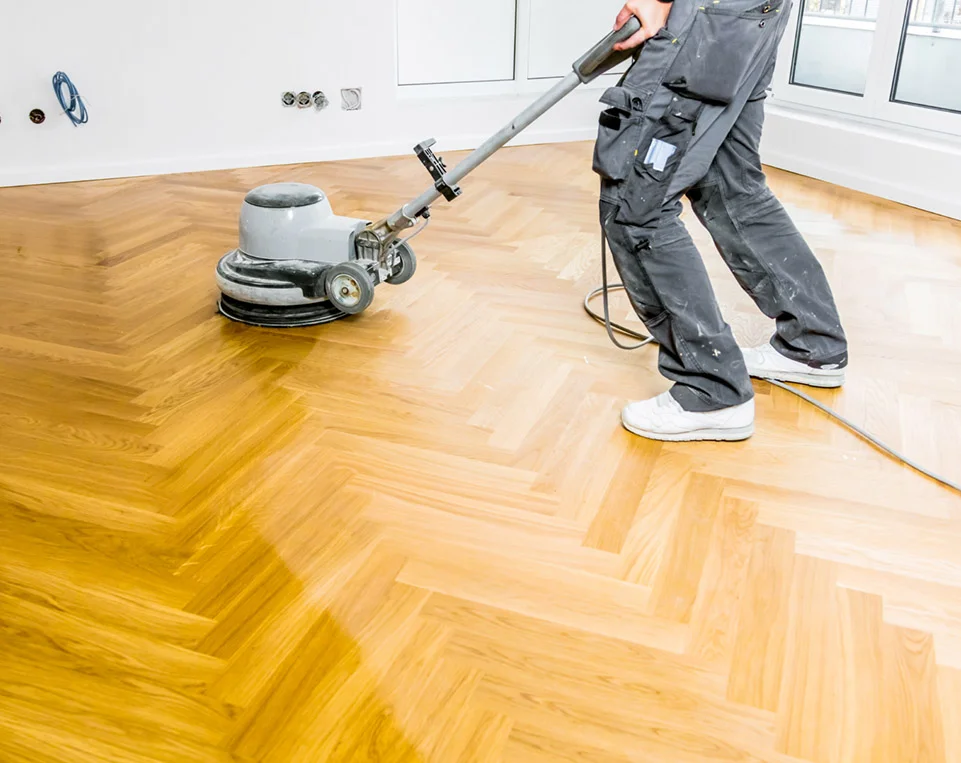
Step-by-Step Hardwood Floor Sanding Process
Even with experience, sanding is a time-consuming process. Expect 3 to 4 days for an average 3-bedroom home if you dedicate yourself from start to finish.
Step 1: Level the Floor
Start with a coarse-grit sandpaper to remove the old finish and flatten uneven spots. Rent a professional drum sander from a hardware store; the staff can show you how to operate it safely.
Step 2: Smooth and Refine
Once the surface is level, repeat the process with a medium, then fine-grit paper to achieve a smooth base. Each pass should remove the scratches from the previous grit.
Use an edge sander or power hand sander to reach corners and walls where large machines can’t. Working in pairs, one on the main floor, one on the edges, can cut your time in half.
Step 3: Clean the Dust
Vacuum thoroughly using a shop vac with a HEPA filter or dust bag. Wait overnight for any remaining dust to settle, then vacuum again before applying the finish. This step prevents small particles from ruining your final coat.
Choosing the Right Finish
After sanding, your next step is applying a finish to protect the wood and bring out its natural beauty.
- Water-based polyurethane: Low odor, dries in 4–6 hours, and stays clear without yellowing.
- Oil-based polyurethane: Rich color and durable, but stronger odor and longer drying time (8–16 hours between coats).
For Ottawa homes, many homeowners prefer water-based finishes for quicker drying and fewer fumes. Always check the manufacturer’s VOC (volatile organic compound) rating: low-VOC options are safer and meet Health Canada indoor air quality standards.
DIY vs Professional Floor Sanding
It’s tempting to handle sanding yourself, but there’s a fine line between saving money and risking costly damage.
DIY sanding pros:
- Lower upfront cost
- Flexible schedule
DIY sanding cons:
- Learning curve with heavy equipment
- Risk of gouging or uneven sanding
- Longer cleanup and dust management
Professional sanding teams use commercial-grade dust containment systems and high-precision sanders to ensure a flawless result.
A quick reality check
The cost of hardwood floor sanding in Ottawa varies based on floor condition, square footage, and chosen finish. While DIY seems cheaper, hiring experts often prevents expensive mistakes and delivers a cleaner, longer-lasting result.
What Is the Dustless Floor Sanding Process?
A common question homeowners ask is, “Is there really such a thing as dustless sanding?”
The truth: no system is 100% dust-free. But professional sanding machines use vacuum attachments that capture up to 95% of airborne dust, keeping your home cleaner and air quality safer during and after the job.
Ottawa’s dry winters make dust control especially important to protect indoor HVAC systems and avoid breathing irritation.
Safety and Best Practices
Following local safety and environmental guidelines ensures a clean and compliant sanding job:
- When using oil-based products, ventilate the room to prevent fumes from lingering indoors.
- Always wear a dust mask, eye protection, and hearing protection while sanding.
People Also Ask: How Can I Prepare for Hardwood Floor Sanding in Ottawa?
Preparing your home makes the process smoother. Clear all furniture, seal vents, and remove floor coverings before sanding begins. Protect adjoining rooms with plastic barriers to keep dust from spreading throughout your home.
Quick Tips for a Successful Sanding
- Rent or buy the right grit sequence: coarse, medium, fine.
- Never stop the sander while it’s running; it can dig into the wood.
- Keep your movement slow and steady along the wood grain.
- Clean up immediately after sanding to avoid dust settling back on the surface.
- Allow the finish to cure for at least 24–72 hours before heavy use.
Bringing It All Together
Hardwood floor sanding takes patience and precision. For Ottawa homeowners, it’s the key to restoring floors damaged by time, salt, or daily wear. While DIY sanding is possible, professional results ensure your hardwood shines for years to come.
At Flooring Now, we combine years of local experience with professional tools and finishes to make sanding and refinishing safe, efficient, and beautiful. If you’re considering hardwood floor sanding in Ottawa, don’t hesitate to contact us.
FAQs: Hardwood Floor Sanding Ottawa
1. How long does it take to sand hardwood floors in Ottawa?
A typical 3-bedroom home takes about 3–4 days from start to finish, including drying time.
2. Can I stay home during sanding?
You can, but it’s better if the space is empty. The work is noisy, and the finishes have an odor. We seal doors and use vacuums to control dust if you must stay.
3. How much does hardwood floor sanding cost in Ottawa?
Pricing varies by floor size, wood type, and finish. We provide clear, on-site quotes so you know exactly what’s included before work begins.
4. What’s the difference between sanding and refinishing?
Sanding removes the old finish and smooths the surface. Refinishing adds a new stain and sealer for colour, shine, and protection.
5. Is dustless sanding really dust-free?
Not completely, but modern vacuums capture most of it. Our system keeps your home clean and air quality safe.
6. How often should I sand and refinish my floors?
Every 7–10 years for average traffic, or sooner if your floors look dull, scratched, or faded.